Showing posts with label Before and After. Show all posts

Sunday, 20 October 2013

7 steps to the perfect eyebrows!

Eyebrows for me are super important, the correct shape and color can make or break your whole look... having your eybrows on point even for a minimal look is super important!

My friend came over last night and I reshaped as well as filled in her eyebrows... 


I used an angled brush, and used Fashionistas brow palette to fill in (you can use brown eyeshadow also, or any other brow palette)

STEP 1 - Shape eyebrow with any method you prefer, I used tweezers. 
STEP 2 - using the wax from the palette I went over the brows, this helps to hold the hairs down and keep the shape. 
STEP 3 - mix some of the darkest brown with 1 drop of Illamasqua sealing gel to make a paste (the paste should be a little thick) the sealing gel helps make your eyebrows waterproof & smudge proof.
STEP 4 - line and shape with the angled brush under the eyebrows
STEP 5 - using gentle brush strokes fill in the brows
STEP 6 - neaten up the edges (on top and underneath the brows) with a concealer brush and some concealer, on in this case, I actually used NYX Primer in shade SKIN TONE
STEP 7 - set the primer with a nude eyeshadow and then highlight using any highlighting powder you like. in this case I used Urban Decay Naked Basics Eyeshadow in W.O.S and to highlight VENUS.

For the rest of the face, I used Daniel Sandler Perfect Canvas in shade 09, this shade was amazing on her, and made her face look flawless, almost airbrushed! 

She loved the outcome of the whole look, that she is now buying most of the products I used on her, in particular the Illamasqua Sealing Gel and the Daniel Sandler Perfect Canvas Foundation

What do you think of her new eyebrows? What method do you use when filling in and shaping yours?? 

LINKS - 

www.danielsandler.com - for the foundation
www.very.co.uk - I bought my illamasqua sealing gel from here
www.nyxcosmetics.co.uk - I bought my eye primer from here, but Very also stock it. 
www.debenhams.com - this is where I bought my UD palette. 


Sunday, 8 April 2012

GARNIER BB CREAM (MEDIUM)

MY 'IM IN A RUSH MAKEUP ROUTINE' ...

Hey ladies... I thought I would blog about what I wear when I'm in a rush, and dont really want to wear too much makeup routine... this is great for the summer too! 

Now I just wanna add also, that I stopped wearing too much makeup, especially Foundation on a daily basis, simply because I felt my skin was begging for it, and quite frankly I prefer to sleep than to wake up early to have time to do my makeup before going to work ... but I do find that when I want to wear a bit of makeup, these products are my go to products (mainly for work purposes, cus when its time to go glam up, i go all out!) ....

bueno mujeres, aqui les dejo las pics... and a brief description...


FASHIONISTA - Flawless Primer
GARNIER - Miracle Skin Perfector (BB Cream, in MEDIUM)
L'OREAL - Telescopic Mascara in Black
ELIZABETH ARDEN - Lash Optimiser
NYX - Eyeshadow Base in NUDE
NYX - Lipgloss
BARBARA DALY - eyeshadow pen in 'CALICO'

BEFORE


AFTER

Its not a major difference, BUT! its a more 'flawless' outcome... my skin looks more even, my eyes look brighter... the point to this look is that your not supposed to look like you have shit loads of makeup on, and its supposed to take you about 10mins maximum to apply...

The products that I have used are all FABULOUSSSSS and I would highly recommend them... you do not need to use all the products, if unlike me you have better skin, then skip the primer, and just use the BB cream, also you do not need to use the Lash Optimiser if you have pretty nice loooong lashes (mine are not that short, but they are kinda weird so the optimiser helps loads!) ...

you can purchase most of these products online, Boots, or Superdrug... I purchased the Elizabeth Arden Lash Optimiser from VERY.co.uk ....

i hope you found this helpful in some way or another, any questions feel free to leave a comment :)

Enjoy the rest of your Easter weekend...

Muuaahhhh JennJenn

Sunday, 25 March 2012

BRIDAL MAKEUP 24/03/12

 BRIDAL MAKEUP

On Saturday I had the honour of doing my friends hair and makeup for her wedding, I also did the mother of the brides hair and makeup... below are a few pics...


For both gorgeous ladies I used Too Faced Shadow Insurance on the eyes before applying any eye shadow, and FashionistA's Flawless Primer before applying the foundation.

THE BRIDE:

I used eyeshadows from the Urban Decay 'Naked' palette
Barbara Daley shadow stick
Maybeliene Gel Liner in black
Max Factor Waterproof Mascara
Ardell #122 Lashes
Giorgio Armani Foundation
NYX Lipgloss
SLEEK Contour Palette in Medium
L'Oreal blusher in Rose
Highlighted using VIVO's baked bronzer (which is better for Highlighting)

MOTHER OF THE BRIDE:

Eyeshadows from the Urban Decay 'Naked' palette
Maybelliene Gel Liner in Black
Max Factor Waterproof Mascara
Ardell #122 Lashes
Clinique Foundation
NARS Lipliner
INGLOT lipstick from my customised lip palette.


Monday, 26 September 2011

BIRTHDAY TREAT...

Saturday was a bit of a mad one for me, as well as exhausting... I had a photoshoot in the morning, which hopefully I will have pics to show soon, and then in the afternoon I was in East London making a birthday girl look even more gorgeous for her night out... a well deserved night out!

BEFORE
AFTER
Alejandra wanted a smokey silver look...
I applied a silver shadow to the eyelid
Grey shadow to the crease
 Black shadow to the outer 'V'
Eyes where lined on the top and lower lashes
Ardell lashes where then applied - I looooove these Ardell lashes!! they look so natural
Her lips where lined with NARS lipliner then the rest of the lips filled in with a nude lipstick

Her hair was very very curly, so I applied Phyto Defrisant Balm all over the hair, then blowdried section by section...
I then used hair straighteners to give it a smooth/sleek look
Finally, I used curling irons to do some loose curls to the ends of the hair.

I think she looked fab!


Wednesday, 21 September 2011

COLOMBIAN BLONDE BOMBSHELL...AAOOWWW!! ::HOTT::

lol ok so after a lack of inspiration for a title in the previous post... i think i went over board with the current one... from one extreme to the other... thats just me!! type 'bi-polar' i gues... anywhooo... so this post features my prima (cousin) Diana Marcela... a mixture of hers and my products was used, I tried to use mainly her products as I wanted to show her how she can get the most out of what she already has...

This time i did do a before pic - yeay me! (ok yeay Marcela cus she reminded me!)


THE AFTER PICS... 


PRODUCTS USED:

TOO FACED SHADOW INSURANCE - best eye primer!!!
NYX JUMBO PENCIL IN MILK - this is just one of those products that everyone should have!
MARCELA'S OWN STILA PALETTE - silver/pearly shade applied all over the lid and upto the brow bone, then a gray eyeshadow applied to the lid, a darker shade of grey applied to the outer corner, exaggerating the 'V' shape and blending right into the crease... the same grey shadow was also applied under the bottom lashes.
RIMMEL KOHL PENCIL IN BLACK - applied to the waterline
RIMMEL LIQUID LINER (MARCELAS OWN) - applied in a thinly to the top lashes, staying very close to the lash line
RIMMEL EYEBROW PENCIL IN 'HAZEL' - filled in eyebrows and gave them more of a fuller shape..

MARCELAS OWN FOUNDATION APPLIED WITH A FOUNDATION BRUSH
MAC CONCEALER - applied under the eye
INGLOT BRONZER
L'OREAL BLUSH - applied only on the apples of the cheek

USED A NUDE SHADE OF LIPSTICK FROM THE SUE MOXLEY FAMOUS LIP PALETTE


 Hair was styled in big barrel type curls... and set with Phyto Professional Workable Holding Spray...


Love how it looks on her!! we also styled her hair slightly differently, see below pics... this really gave her gorgeous green cat eyes!


the above would be great for a bridal hair do also... and it was super easy and quick to do...

what do you think??? is this something you will be trying for your next night out???
would love some feed back!! so feel free to comment away! :)

Another Makeup & Hair Post...

I really didnt know what to call this post... I wasnt feeling too creative I guess?? blah! so you guys can call it how you like, I had thought Copper Godess, but thought it sounded type corny??? .... hummm anyways, onto the more interesting bit... one of the besties was off to a Quinceanera bday party (think sweet 16) so she wanted her makeup and hair done...usually I do take a before pic... but this time round I didnt boooo me!

PRODUCTS USED:

FACE:
NYC Foundation
BODY SHOP LOOSE POWDER TO SET THE FOUNDATION
SLEEK CONTOUR PALETTE IN MEDIUM
L'OREAL BLUSH IN TEA ROSE
HIGHLIGHTED CHEEK BONES WITH MAC MINERALIZE IN SOFT & GENTLE
INGLOT BRONZING POWDER
RIMMEL EYEBROW PENCIL IN 'HAZEL'

EYES:
TOO FACED SHADOW INSURANCE
NYX JUMBO PENCIL IN MILK
NYX PEARL PIGMENT IN COPPER
USE 'ACT' FROM THE SIGMA BARE PALETTE IN THE CREASE
TO HIGHLIGHT UNDER THE BROW I USED 'APPROACH' AGAIN FROM THE SIGMA BARE PALETT.
LINED UPPER AND LOWER LASHES WITH RIMMER KOHL PENCIL IN BLACK
L'OREAL TELESCOPIC MASCARA - i absolutely love this mascara!!!! just incase you hadnt already noticed :)

LIPS:
LINED WITH A SOFT PINK LINER BY L'OREAL (sorry again forgot the name of the shade!)
THEN USED OCC LIPTAR- its a pink/nude shade, the actual name of the color has already rubbed off.


THE HAIR:
The hair was blow dried, then curled from mid length to the ends...


PRODUCTS USED:

PHYTODEFRISANT RELAXING BALM - used on damp hair then combed through
PHYTOLISSE SERUM - used on the ends of the hair only
PHYTOVOLUME ACTIF SPRAY- sprayed directly onto the roots to add volume before blow drying
once the hair was all blowdryed, I then used my Babyliss curling iron and curled section by section..
PHYTOPROFESSIONAL WORKABLE HOLDING SPRAY - used to set the curls
the front of the hair was then backcombed slightly and pulled back to one side in a quiff style and held in place with a few pins... more hair spray was used to keep whispy bits in place!


here's a few links to check out:

www.nyxcosmetics.co.uk
www.phyto.com
www.inglotcosmetics.com


Saturday, 10 September 2011

AUTUMN BRIGHTS.... Colaboration with Ayshe @ DiscoveringBeauty

Hey loves... so today I finally had the opportunity to collaborate in a blog post with Ayshe from Discovering Beauty (YEAYYY!!)

lol plz excuse my retard face in this pic! 
 We had been planning to do this for a while and it was so much fun, anything to do with talking bout makeup and cosmetics is fun to me!! lol
http://discoveringbeautytoday.blogspot.com/
Todays posting will be about 'Autumn Brights' or for my USA/Canada readers 'Fall Brights' - generally this time of the year, people tend to stick to Greens, Golds and Browns, so we took it a step away from the norm and went for a Teal & Purple look... I know I have done a post with a similar look, and many others have used the same look under 'Peacock' Eyes Makeup looks, but we took inspiration from Ayshe's dress which she was wearing to a wedding... it has teals, blues, and purple all over... so pwetty! :)

 Ayshe has only just started experimenting with colour and I think she should carry on using a mix of colours on her eyes, she has beautiful big brown eyes so anything dramatic is going to look UH-MAZIN! see below for some more pics and brief description on what was used ...


Before... always gta have a before pic! :)
She had already applied her base

After Pic... contoured, highlighted, nude lips, bright eyes, eyebrows shaped and filled in - she looked so beautiful :) I know she must have made an impact at the wedding... sorry bride, if she took your lime light!! uupppsssss ;)


  • Eyes primed with Too Faced Shadow Insurance
  • Then ontop applied NYX Jumbo Pencil in 'Milk' - blend with finger
  • Apply teal coloured all over lid
  • Apply a purple in the crease - then blend in to diminish any harsh lines
  • Apply a highlighter to the brow bone - I used MAC Naked Lunch
  • Apply a goldish pigment to the inner corners then blend into the teal colour 
  • ELF Cream Liner used to line the upper lashes
  • Apply Lashes - we used ELF lashes
  • Apply mascara to blend the natural lash with the fake lashes
  • Line lowe lashes with an Aqua/Teal liner 
  • Line the water line with a black kohl
  • Using concealer (we used MAC) tidy up under the eyes and conceal any dark circles
  • Fill in and shape eyebrows - we used Rimmel Brow Pencil in Hazel

  • We contoured using SLEEK Contour Kit in Light
  • Applied highlight to the cheek bone
  • Applied a rose/pink blush then blended it all together 
  • Apply a nude liner to lips, then apply lipstick - we used SLEEK lipstck but i forgot the shade! eekk sorry
And here is the final look :) ... again ;) 
 Watch out for Ayshe's post on todays makeup experience ... and if you are not already subscribed to her blog, go ahead an subscribe!! :)

http://discoveringbeautytoday.blogspot.com

Thursday, 18 August 2011

Naturally Glamorous

A bit of a delayed post with this one, as I did this look for one of my besties bday back in July!!
She didnt want anything too heavy, and opted out of Lashes... its just as well she has naturally long lashes! :)

anyways sooooo... here's a few pics... i think she looked amazing!! :) what do you think???


PRODUCTS USED:

As always, I used a primer on the face before foundation application - URBAN DECAY Primer
Eyes shadow base - Too Faced Shadow Insurance
Barbara Daly Cream shadow ( best cheap product I've bought!!! )
'Bare' Sigma Palette - 'Snoop' (a charcoal type colour) for contouring the eye... then applied 'Approach' to highlight the brow bone...
I then thickly lined her upper lid with Borjois Liquid Liner in Black
Added about 4 coats of Mascara - L'oreal Telescopic (my favorite mascara!!!)
For contouring and giving her some killa cheek bones, I used Sleeks contour kit in Medium, and then highlighted just above the cheekbone using MAC Mineralize (forgot the shade! but Ive mentioned it in other posts)
As for lips... well in the first pics, we used a simple nude lip by NYX...
and in the last pics, she is wearing Girl About Town by MAC ... she looked gorgeoussssss ...

HAIR:
As for the hair... I slicked her hair back and then added a hair piece to give her some length :)


Thursday, 2 June 2011

La Magia Del Maquillaje!!!

Ahora ultimo Jennifer Lopez seems to be hot topic!! Everyone is amazed by her 'comeback' y entre nosotras las mujeres, admiring how freaking awesome she looks!!!! It has to be said, the woman just looks amazing... and then i discovered something .... una foto que demuestra la magia del maquillaje... and how contouring along with good makeup application can change you in an instance...


Como ven, miss J-Lo doesnt look too hot in this pic... but then again only a few lucky people do look good without so much makeup!! Yo por lo menos me veo fatal sin maquillaje, me veo enferrrrrma lol
Now the main reason for this posting, is simply to highlight the fact that all these glamorous celeb ladies who most of us admire, dont look amazing 24/7 and it only takes a bit of makeup to look just as amazing!! Its not even about expensive makeup, its all about investing in the right shades, and learning some good aplication techniques...


here is another celebrity Latina not looking too hot without the makeup (i think we have all seen this pic) ...


So the next time you look at a celebrity and think damn i wish i looked like her... just switch it to 'yep I'm going to try that makeup look...hair look...maybe even fashion style' (there is always something similar out there, without the celeb price tag)'

Now just to finish it up, in no way, shape or form, am i HATING! ... with or without makeup, they are still women and we are all beautiful in our own ways... just simply stating that makeup really does help...


JennJenn :)

Friday, 18 March 2011

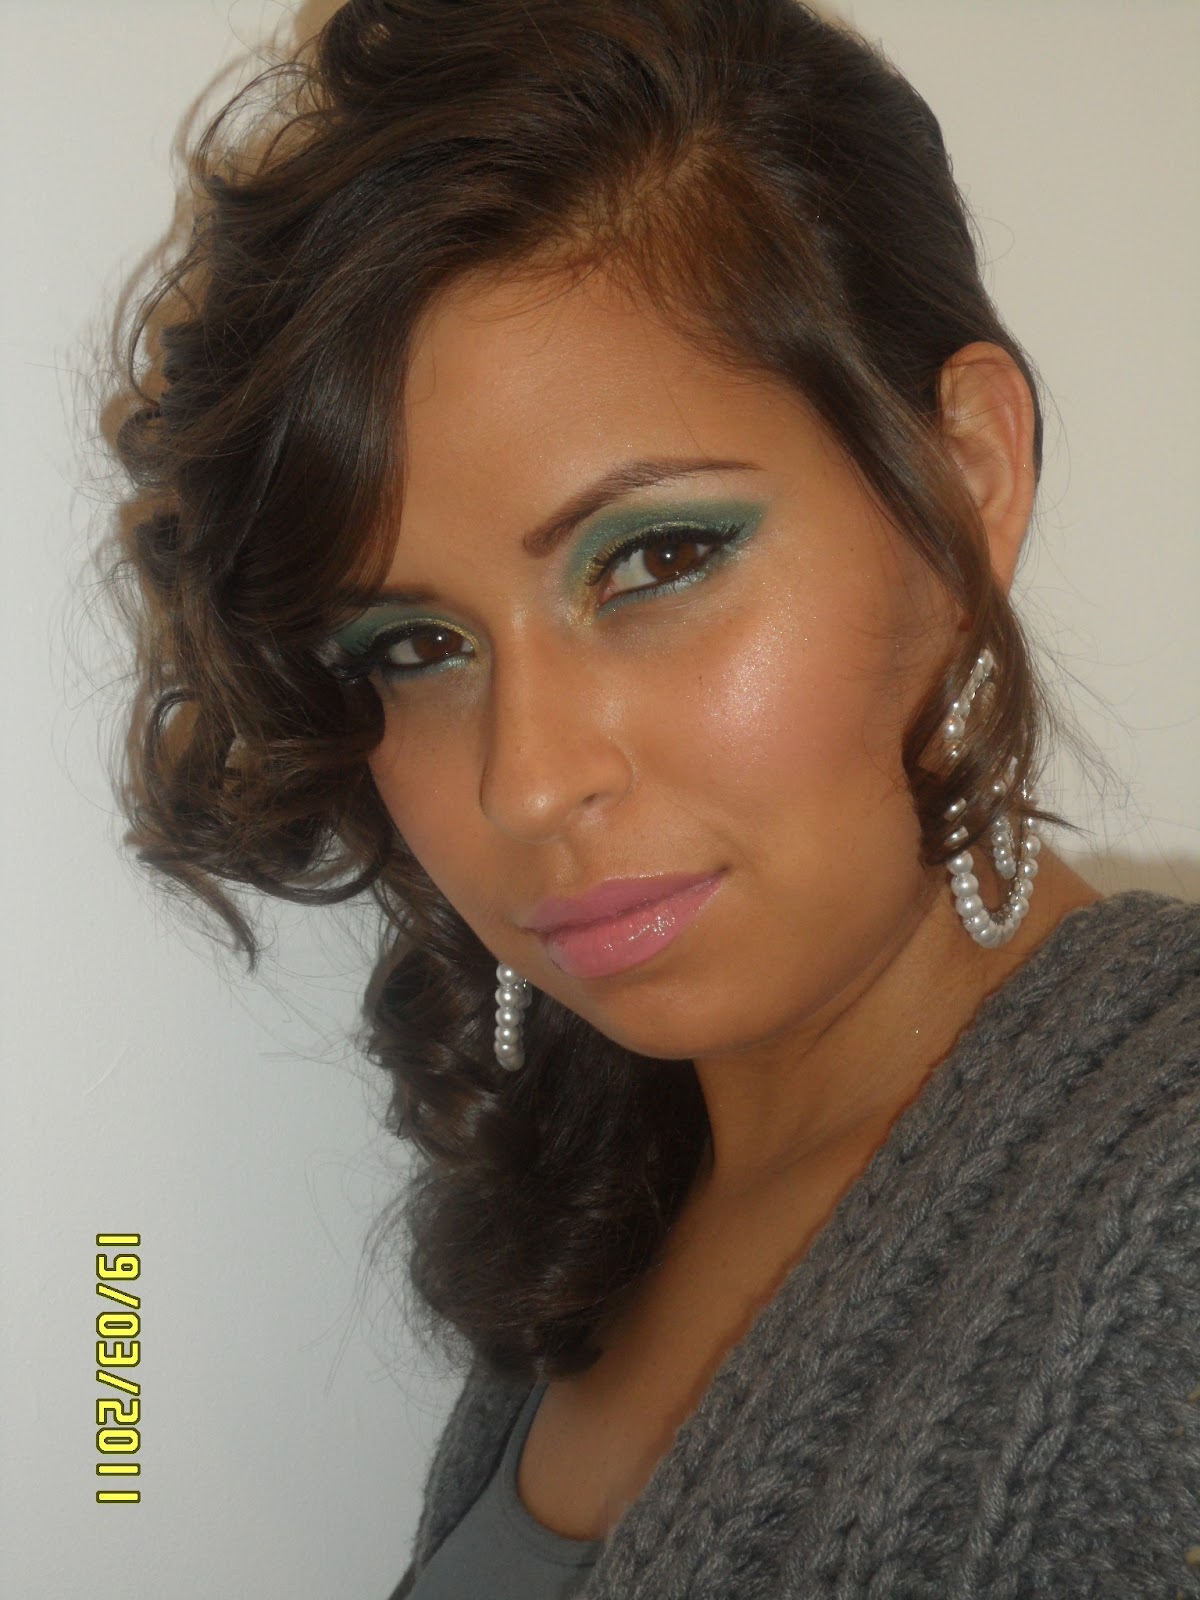
MAKE-OVER: Gold & Teal Eyes :)

Ok so its been a few days since i posted something, its been nuts at work so I really havent been inspired to write anything ... blah! but im back with something awesome!! Ages ago i asked my friend to be a model for me so I cud do some makeup for the blog, finally today we managed to get round to it! it was so much fun, I just love how makeup can transform smeone, from the most simple makeup, a tweek here and there, even a different hair style!

Anyways, so my friend doesnt usually wear alot of makeup, mainly just blush, lipgloss a bit of liner and thats about it... she had recently seen what i think is the Rimmel advert with all the crazy colours (woohhhooo someone who will let me use bold colours!!!) and so she wanted to try something bright and fun ... Because of her skin tone I thought AQUA, TEAL, GOLD... these colours looks so amazing on tanned skin!! soooooo keep scrollin and see what the outcome was .... aaahhhh i had soooo much fun doing this look!!!! :)

Before applying any makeup, I primed Paola's face with Urban Decay Complexion Potion and then primed her eyes firstly with Too Faced Shadow Insurance, and then with a synthetic brush I applied MAC Prep + Prime in medium.


EYES:
set the primer with either a nude or white matt shadow - i used The Body Shop Eye Colour Matte in #13
I then applied in the inner corners of the eyes a gold pigment - NYX Pearl Pigment in Yellow Gold
Then i applied a light green to the lids only - NYX Pear Pigment in Lime Pearl
I then applied a teal colour to the crease and blended - i used two different colours one from Sleek palette and one from my Manly Palette, you can you which ever colour you have.
although you cant notice it, I also applied a navy blue just to the outer 'V' and blended with the teal.
I then highlighted under the brow using MAC Naked Lunch - this is like a pinkish/gold tone
I then lined her upper lash line with SLEEK Ink Pot
I lined the lower lashes first with a teal colour pencil by a brand called Deborah (bought in Paris) you can probably find a good similar colour by looking at NYX pencils or even Barry M.
I then lined her waterline with AVONs Glimmer Stick in Black
I then applied some lashes by E.L.F (the glue sucks so I used my Eyelure glue which i love!)


EYEBROWS
using light strokes I filled in her brows using a brown eyebrow pencil by Rimmel


FACE
I used LAURA MERCIER Concealer under her eyes, and around her nose
Then applied NYC Foundation in Natural Tan
then I set her foundation with a powder, i used one by L'Oreal
For contour, I used SLEEK Face Contour Kit in Medium, i applied just under her cheek bone, and also around the sides of her nose.
To highlight, i used a little bit of pearl pigment by NYX in Nude Pearl then over that I used MAC Mineralize Skin Finish in Soft and Gentle (this looks amazing on her!!) looks much better than on me!! lol poohhh
I then applied some pink blush by L'Oreal in True Rose


LIPS
for the first few pics I used a plum shade of lipgloss which i recently bought from E.L.F
for the pictures where Paolas hair is down and curly, I used a pink matte lip colour by bourjois

And there you have it girlies... espero les haya gustado el resultado! If you are not comfortable applying eyeshadow or want something quick, remember, just get an eye pencil in the colour you want (in this case a teal colour) and line both your upper and lower lashes for instant colour :) without the fuss ;0)

Aqui las dejo con mas fotos ...


Related Posts Plugin for WordPress, Blogger...